Create your own CA with TinyCA2 (part 1)
A Certificate Authorities (CA) issues certificates to people and organization that gives us the possibility to know that we surf to the right web site and not a phising site. This concept can be nice to use on your private sites too, but you may not want to spend a lot of money to get a certificate for your site.
Most common when one installs a web-mail server at home is using a self signed certificate. When one surf to the web-mail server from a friends computer one can not be sure that nobody listens to the traffic if one not verifies the signature of the self signed certificate.
Maybe an easier and definitely a more scalable solution to this is to create ones own CA structure. When we are ready with this how to you will have installed a certificate on your web server, installed the root certificate into your Firefox, and you will have the root certificate stored on a USB-memory stick. First time you want to read your mail from a friends computer you install the root certificate from the USB-memory into the web browser and then your web browser will automatically verify your website and that no one are listening on the internet traffic. This assumes, of course, that your friends computer have no key loggers or other Trojans installed.
The certificates must not only be used for web-mail. You can use it for all network servers that uses SSL, for instance to set up your own VPN. If you give the root CA to your friends you can use it to sign your e-mails.
If you want to know details about cryptography works with certificate and CA:s I recommend you to read Wikipedias page about Public-Key Cryptography.
The easiest way to create a CA is to create one Root CA that signs all your certificates. This means that only one person can sign certificates or you will not be able to see who signed the certificates. We will do it a bit more scalable by create a sub-CA that we uses to sign certificates. Each person that have the rights to sign certificates have its own sub-CA. The root certificate is only used to sign new sub-CA:s.
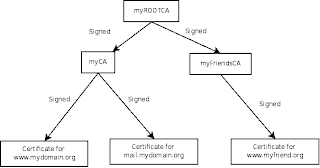
This also gives you the opportunity to give your friend their own Sub-CA. Isn't that a nice gift? Your friend can then create and sign certificates for his own web server and other network services. When he visits you and surf to his web site he does not have to install any root certificate on your computer. You will share the same root certificate and every service that you signs he will trust and vice versa.
 Okey enough with theory lets start doing it. Begin with installing TinyCA2. If you use Ubuntu you will find the package in universe and it is called tinyca.
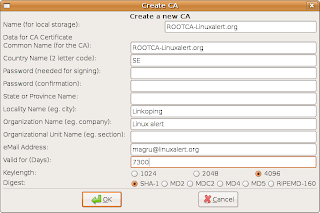
First time you start tinyca2 you are asked to create a new CA. This will be your root CA. I call mine ROOTCA-linuxalert.org. I also changed the valid days from 3650 days to 7300 days. The password is the password you will use when signing new sub-CA:s. Fill the fields in and then press OK.
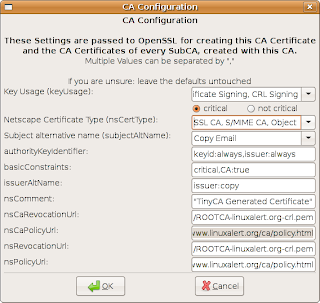 You get a new window were you configure the root CA. Set Netscape Certificate Type to "SSL CA, S/MIME CA, Object Signing CA." If you want to be able to revoke issued certificates, which may be good, fill in the two revocation fields with the URL where the revocation list can be found, i.e. https://www.linuxalert.org/ca/ROOTCA-linuxalert.org-crl.pem. Then press OK.
It takes some time to create the CA. When your root-certificate is ready and you get a new window.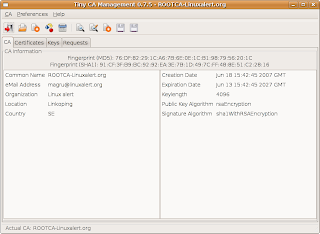 This is the main window for TinyCA2. There are four tabs in this window. The first, CA, shows information about the CA you currently are working with. The second, Certificates, shows the certificates generated from the CA. The third tab, keys, lists the certificates corresponding keys. Finally on requests tab are requests for signing listed.
One drawback with TinyCA2 is that the icons in the tool bar does not shows any tool tips. The workaround for this is to click on the icons and you g see what the dialog widows that says what the icon does. You can always cancel.
Now it is time to create the sub-CA.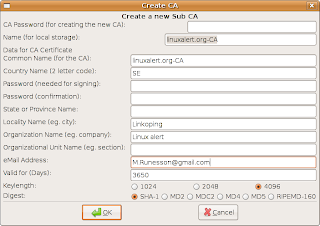 Verify that you have the CA-tab selected. Then click on the third icon from the right in the tool bar. You get a new window which is similar to the one when created the root certificate. Note that this says "Create a new Sub CA" and starts with a field where you must enter the password for the root CA. (If you have a hierarchy with several levels then its the new sub-CA:s parent CA:s password.) I call my sub-CA linuxalert.org-CA. The password of the sub-CA must not be the same as the root CA. (It can but its not good in the view of security.) Fill in the fields and press enter.
The sub-CA is created and signed in one step. When the application returns to the main window the newly created sub-CA is the current CA. If you want to go back to the root-CA select the CA-menu and open. Then you will get a dialog with all CA:s you have created or imported into TinyCA2. From now, the only things you should use the root CA for are:
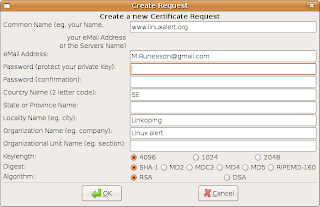 Now its time to create the certificate for the web server or to be correct for the web site. Select the requests tab. Right click and select "New request". You get a new window called Create Request. The common name must be the same name as the users use to access your server, in my case www.linuxalert.org. Once again, you have to enter a password and once again it must not be the same as the previous passwords. (I use the gnome application Revelation to remember of my passwords.) Fill in the form and press OK.
The new certificate will be listed in the requests tab in the main window. Right click on the request and select "Sign request". You get a question if its a server or client request. In this case, select server. Y ou get a new window asking for the CA password. It is now you as a CA approve the request and confirms that the certificate holder is the correct owner of the common name in the certificate and the rest of the information in the certificate is correct. At the same time you will decide for who long time the certificate is valid. Enter your sub-CA:s password and press OK. You have now signed your certificate.
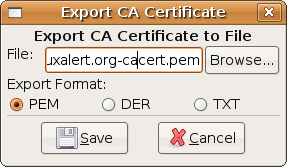
In my next blog we will export the certificates from TinyCA2. Then we import the root certificate into Firefox and configure Apache httpd to use our web site certificate.
Most common when one installs a web-mail server at home is using a self signed certificate. When one surf to the web-mail server from a friends computer one can not be sure that nobody listens to the traffic if one not verifies the signature of the self signed certificate.
Maybe an easier and definitely a more scalable solution to this is to create ones own CA structure. When we are ready with this how to you will have installed a certificate on your web server, installed the root certificate into your Firefox, and you will have the root certificate stored on a USB-memory stick. First time you want to read your mail from a friends computer you install the root certificate from the USB-memory into the web browser and then your web browser will automatically verify your website and that no one are listening on the internet traffic. This assumes, of course, that your friends computer have no key loggers or other Trojans installed.
The certificates must not only be used for web-mail. You can use it for all network servers that uses SSL, for instance to set up your own VPN. If you give the root CA to your friends you can use it to sign your e-mails.
If you want to know details about cryptography works with certificate and CA:s I recommend you to read Wikipedias page about Public-Key Cryptography.
The easiest way to create a CA is to create one Root CA that signs all your certificates. This means that only one person can sign certificates or you will not be able to see who signed the certificates. We will do it a bit more scalable by create a sub-CA that we uses to sign certificates. Each person that have the rights to sign certificates have its own sub-CA. The root certificate is only used to sign new sub-CA:s.

This also gives you the opportunity to give your friend their own Sub-CA. Isn't that a nice gift? Your friend can then create and sign certificates for his own web server and other network services. When he visits you and surf to his web site he does not have to install any root certificate on your computer. You will share the same root certificate and every service that you signs he will trust and vice versa.
 Okey enough with theory lets start doing it. Begin with installing TinyCA2. If you use Ubuntu you will find the package in universe and it is called tinyca.
First time you start tinyca2 you are asked to create a new CA. This will be your root CA. I call mine ROOTCA-linuxalert.org. I also changed the valid days from 3650 days to 7300 days. The password is the password you will use when signing new sub-CA:s. Fill the fields in and then press OK.
 You get a new window were you configure the root CA. Set Netscape Certificate Type to "SSL CA, S/MIME CA, Object Signing CA." If you want to be able to revoke issued certificates, which may be good, fill in the two revocation fields with the URL where the revocation list can be found, i.e. https://www.linuxalert.org/ca/ROOTCA-linuxalert.org-crl.pem. Then press OK.
It takes some time to create the CA. When your root-certificate is ready and you get a new window.
 This is the main window for TinyCA2. There are four tabs in this window. The first, CA, shows information about the CA you currently are working with. The second, Certificates, shows the certificates generated from the CA. The third tab, keys, lists the certificates corresponding keys. Finally on requests tab are requests for signing listed.
One drawback with TinyCA2 is that the icons in the tool bar does not shows any tool tips. The workaround for this is to click on the icons and you g see what the dialog widows that says what the icon does. You can always cancel.
Now it is time to create the sub-CA.
 Verify that you have the CA-tab selected. Then click on the third icon from the right in the tool bar. You get a new window which is similar to the one when created the root certificate. Note that this says "Create a new Sub CA" and starts with a field where you must enter the password for the root CA. (If you have a hierarchy with several levels then its the new sub-CA:s parent CA:s password.) I call my sub-CA linuxalert.org-CA. The password of the sub-CA must not be the same as the root CA. (It can but its not good in the view of security.) Fill in the fields and press enter.
The sub-CA is created and signed in one step. When the application returns to the main window the newly created sub-CA is the current CA. If you want to go back to the root-CA select the CA-menu and open. Then you will get a dialog with all CA:s you have created or imported into TinyCA2. From now, the only things you should use the root CA for are:
- create new sub-CA:s
- revoke sub-CA:s
- renew sub-CA:s
- export the root-CA:s certificate.
 Now its time to create the certificate for the web server or to be correct for the web site. Select the requests tab. Right click and select "New request". You get a new window called Create Request. The common name must be the same name as the users use to access your server, in my case www.linuxalert.org. Once again, you have to enter a password and once again it must not be the same as the previous passwords. (I use the gnome application Revelation to remember of my passwords.) Fill in the form and press OK.
The new certificate will be listed in the requests tab in the main window. Right click on the request and select "Sign request". You get a question if its a server or client request. In this case, select server. Y
 ou get a new window asking for the CA password. It is now you as a CA approve the request and confirms that the certificate holder is the correct owner of the common name in the certificate and the rest of the information in the certificate is correct. At the same time you will decide for who long time the certificate is valid. Enter your sub-CA:s password and press OK. You have now signed your certificate.
In my next blog we will export the certificates from TinyCA2. Then we import the root certificate into Firefox and configure Apache httpd to use our web site certificate.

Comments
Compare to when you buy a cert. Your cert will be signed by Verisign or another signer. This signer has its own domain info in their root cert they use to sign your cert.