Managing data access policies in Hive
Managing data access policies in Hive
To efficiently manage access policies in our Hive Hadoop cluster at Svenska Spel we developed a tool Cobra-policytool. Instead of managing our policies in Apache Rangers web interface and tagging information in Apache Atlas it is now integrated into our CI/CD pipeline. We can use our normal development process for our polices too.
In this post I will describe the background to Cobra-policytool and demonstrate how to use it. We recently open sourced Cobra-policytool to be able to collaborate with others.
Earlier this year Svenska Spel migrated our Hadoop cluster to a new cluster using Hortonworks HDP. At the same time we decided to use Kerberos, Apache Atlas, and Apache Ranger to get good security and powerful access control. If you do not know what Atlas and Ranger does I recommend to take a look at my talk from DataWorks Summit Europe 2018.
With Atlas and Ranger in place, next step was to implement and enforce our policies. Soon we realised it was not feasible to sit and tag our tables and columns in Atlas UI and enter policies into Ranger UI. It would be too time consuming and error prone. Neither could we peer-review our changes nor version control them. Finally, as a Hive focused organisation and already had our data model in Oracle SQL Developer Data Modeler, why add another place to enter our metadata and how to keep them in sync?
With these four insights:
- time consuming
- error prone
- lack of version control
- scattered metadata
One question was raised: We already generating much of our ETL code and deploy it with an automated deployment pipeline so why not handle tags and policies the same way?
We did a proof of concept where we added metadata into our data model. This metadata became tags in Atlas. The tags were complemented with a file of policies to be applied to Ranger. It worked well. The BI developer tag the data while modelling, within the same tool. A few people in the team needed to learn write policy files. The rest of the process looks the same for the developer, everything happens in the background.
Over the last few months we have iterated and improved our proof of concept to a production ready tool called Cobra-policytool. After presenting our work at Data Works Summit Europe there were a lot of interest. We therefore decided to open source it.
Cobra-policytool is independent of our use of Oracle SQL Developer Data Modeler. It reads CSV files with tag information and a json-file with our policies and applies these to Atlas and Ranger. It makes it easy for others to use it with their tools of choice or when maintaining them by hand.
We have to this date used Cobra-policytool for our data in Hive but intend to use it for more aspects of our Hadoop cluster later.
The rest of this post I will walk through a simple example how to use Cobra-policytool. It is not intended to cover all aspects but to get you started.
Assume we have a table called customer in the schema example_dev.
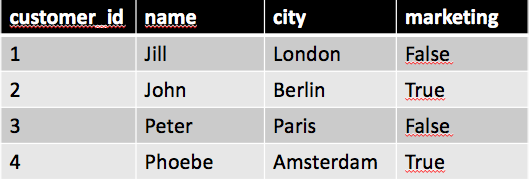 | |||||||
| Customer table in schema example |
We have two groups of users we want to allow work this table. First group are our analysts, they need to read it but are not allowed to see personal identifiable information (PII). Second group are our marketing team. They are allowed to see personal identifiable information but only for users opted-in for marketing, in our case true in the column marketing.
Lets start tag our data to mark what is PII. This is done adding a tag PII to our columns with information that can identify people. To do this we create one CSV-file for tables and columns respectively.
Create the CSV for tables name it table_tags.csv:
schema;table;tags
example;customer;PII_table
Not that we only write “example” as schema, but we said earlier the name was “example_dev”. Cobra-policytool uses the convention to suffix our schema with environment name. This way we can have several environments in one Hive installation.
Create the CSV for columns name it column_tags.csv:
schema;table;attribute;tags
example;customer;customer_id;PII
example;customer;name;PII
example;customer;city;
example;customer;marketing;
We list all columns in the customer table, this way cobra-policytool can determine if tags have been removed from a column. You get a warning of columns not listed. The same is true for tables. If one table or column have multiple tags we separate them with comma(,).
To deploy the tags to Atlas we use the command cobra-policy. Provide the directory of the CSV files, name of our environment and our config file. Look in the documentation how to configure where your servers are. Remember our environment is the suffix to our schema, in this case dev.
cobra-policy tags_to_atlas --srcdir example-dir --environment dev -c myconfig
If you go to your Atlas UI you can search for table customer and see that it have the tag PII_table. So far nothing happens with our data. We must provide policies for our cases.
We start with a policy for our analyst users. When an analyst ask a query in Hive all fields tagged with PII shall be anonymised with an UDF udf.anonymize. The UDF can be any UDF in Hive. Ranger provides som simple masking UDFs. In this example the columns customer_id and name shall be anonymised.
Policies are defined in the file ranger_policies.json that must be stored in the same directory as the CSV files. This is how our ranger_policies.json will look like, turn to the documentation for details.
[{
    "command": "apply_rule",
    "policy": {
        "service": "dev_tag",
        "name": "load_etl_mask_pii_data_analysts",
        "policyType": 1,
        "description": "Mask all column data tagged PII",
        "isAuditEnabled": true
        "resources": {
            "tag": {
                "values": ["PII"],
                "isExcludes": false,
                "isRecursive": false
            }
        },
       "dataMaskPolicyItems": [{
           "dataMaskInfo": {
               "dataMaskType": "hive:CUSTOM",
               "conditionExpr": "udf.anonymize({col})",
               "valueExpr": "udf.anonymize({col})"
           },
           "accesses": [{
               "type": "hive:select",
               "isAllowed": true
           }],
           "users": [],
           "groups": ["analyst"],
           "conditions": [],
           "delegateAdmin": false
       }],
       "isEnabled": true
   }
}]
Note that we are not listing neither columns nor tables. We rely on the tag information. This makes the policies easier to read and maintain.
We deploy our policy with cobra-policytool in a similar way as we applied the tags:
cobra-policy rules_to_ranger --srcdir example-dir --environment dev --project-name post
Now, when a member of the group analyst run a query on the customer table she will only see anonymised data.
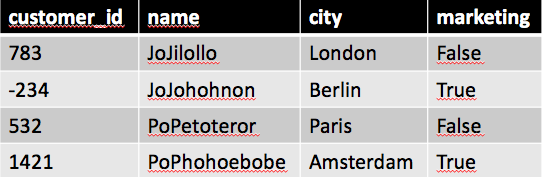 | |||||
| Analysts view of customer table |
In our second use-case our CRM users shall only see customers opted in for marketing. This means we want to only show rows where marketing is true. For this we use row based filtering. Unfortunately one cannot do row based filtering using tags in Ranger, one rule per table is needed. Cobra-policytool add the possibility to have one rule for all tables with a tag. This requires that your filter expression works in all the tables with that tag. When deploying Cobra-policytool will create one rule for each table with a tag.
We extend ranger_policies.json with an apply_tag_row_rule command. This command has next to the policy a filter section used to define what tables, rows, users and groups to match the policy for.
[{
  "command": "apply_tag_row_rule",
  "filters": [{
    "groups": ["crm"],
    "users": [],
    "tagFilterExprs": [{
      "tags": ["PII_table"],
      "filterExpr": "marketing = true"
    }]
  }],
  "policy": {
    "service": "dev_hive",
    "name": "${project_name}_${environment}_${schema}_${table}",
    "description": "Row filtering policy for CRM",
    "policyType": 2,
    "isEnabled": true,
    "resources": {
      "database": {
        "isExcludes": false,
        "values": ["${schema}_${environment}"],
        "isRecursive": false
      },
      "table": {
        "isExcludes": false,
        "values": ["${table}"],
        "isRecursive": false
      }
    },
    "isAuditEnabled": true
  }
},
...]
The policy part will be applied to every table with the PII_table tag. Which tables have the tag is read from the CSV-files. A number of variables are referred in the policy. These will be expanded for each matching table. The variable table will be changed to a matching table name, same for schema. Project_name and environment are taken from the command line arguments. You can also define your own variables in the configuration file.
To apply this rule we once again run our command:
cobra-policy rules_to_ranger --srcdir example-dir --environment dev --project-name post
If we take a look at customer table as a CRM user we only have half of the users there, those with marketing equals true.
 |
| CRM users view |
Our two groups of users; analyst and CRM, have now only access to the data they need. Data is anonymised for analysts and CRM users only see customers opted in for marketing. When having a few rules it is straight forward to use this on all our data in the warehouse. Our experience is that getting our intention into crisp policies is the hard part. When that is in place is creating the policy file straight forward.
Enforcing of our data policies are achieved creating three files and using Cobra-policytool. Two CSV files defining tags to mark important aspects off tables and columns. One json file including our policies. These files are managed in our source repository and deployed like other DDL-scripts. Cobra-policytool can be run over and over agin to guarantee no changes are made manually.
This post have demonstrated how we use cobra-policytool to apply tags and policies to a Hadoop and Hive environment. Thanks to cobra-policytool can we:
- version control our changes to policies
- review changes before deployed
- easily revert when issues appears
- consume tag-information produced from our code generator
- have rule based filtering based on tags instead on individual tables.
Comments