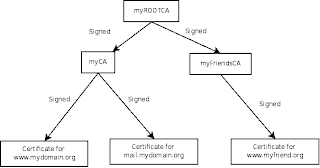
A Certificate Authorities (CA) issues certificates to people and organization that gives us the possibility to know that we surf to the right web site and not a phising site. This concept can be nice to use on your private sites too, but you may not want to spend a lot of money to get a certificate for your site. Most common when one installs a web-mail server at home is using a self signed certificate. When one surf to the web-mail server from a friends computer one can not be sure that nobody listens to the traffic if one not verifies the signature of the self signed certificate. Maybe an easier and definitely a more scalable solution to this is to create ones own CA structure. When we are ready with this how to you will have installed a certificate on your web server, installed the root certificate into your Firefox, and you will have the root certificate stored on a USB-memory stick. First time you want to read your mail from a friends computer you install the root certificate f...
In this final part we will add our own root CA certificate to Ubuntus pre-installed certificates. (Part 1 , Part 2 ) Copy your root CA certificate, that we exported in the previous part, to /usr/share/ca-certificates/. Add the file name to /etc/ca-certificates.conf and run the command: sudo update-ca-certificates Most of your services will now be able to find your root CA certificate. To bring your root CA certificate to your friends, just copy the exported root certificate-file to a USB-memory. Using your own CA you can now add support SSL to different services like CUPS, postfix(AUTH SMTP), dovecot (IMAP) etc. You can also create certificates to sign and encrypt your e-mails.
I have started to take a closer look at Google Web Toolkit (GWT). It looks very nice giving me the possibility to debug AJAX-clients and removing the need for quirks for different browser (read MS IE). Unfortunatly GWT is only shiped as 32-bit and I am running a 64-bit Ubuntu 8.04. The SVN-repository of GWT include some pre-compiled libraries which are compiled for 32-bit Linux. The easy way is to download and install a 32-bit Java from Sun. Following the GWT getting started got me up and running. But I wanted to use my usual Eclipse in 64-bit version. So I started Eclipse and imported my lab project according to the instructions. Then it was time for some settings. First, add the 32-bit Java as an JRE to Eclipse: Open the Window menu and select Preferences. Select Java and then Installed JREs in the tree menu to the left. Select add and pointed out where you installed your 32-bit Java and closed all the dialogs. Now its time to connect the GWT-project to the 32-bit Java. Right click...
Comments